
Pipe fitting custom manufacturers, the main production head, elbow, seamless taper size head, pile tip, seamless taper, tee, Tianyuan, atmospheric tank, product customization
Service Hotline:

09
2023
-
02
Repair of welded components
Author:
The process of reducing the size of the large and small ends of the seamless taper pipe is to put the tube blank with the same diameter at the large end of the taper pipe into the forming mould, and then directly put it into the forming mould. By applying an axis along
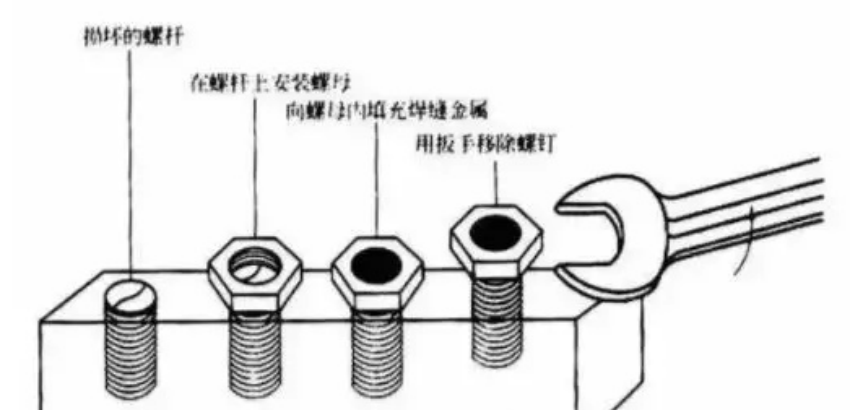
1. In addition to using common nail opener, what other methods can remove damaged or rusty screws? Two methods are mainly introduced here.
① If the installed screw will not be damaged during heating, the oxygen-acetylene welding torch can be used to heat the nut and its assembly until it is red hot, and then water quenching can be carried out quickly to facilitate the removal of the screw. In this process, several heating and cold quenching cycles may be required.
② If the screw slot, nut or tooth slot is damaged or lost, a nut can be placed on the upper part of the screw head (or the residual part), the nut can be tightened, and then the inside of the nut and screw can be filled with metal by any welding method. This will connect the nut and the residual part of the screw, and then place a wrench or tooth wrench on the nut to quickly pull out the screw. This method is beneficial to provide a new grip point and can use heat to tighten the screw. The residual part of the fixed screw can be removed by welding as shown in Figure 4.
2. If there is a worn crankshaft, what is the best way to repair and strengthen it by welding?
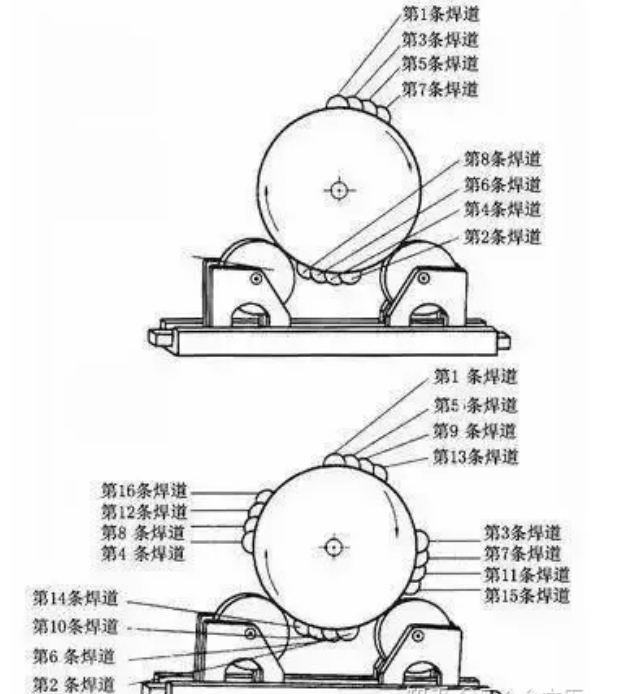
Gas shielded metal arc welding, flux-cored wire gas shielded welding or argon tungsten arc welding can be used to repair worn crankshaft. However, in order to obtain satisfactory weld bead shape, the following four requirements must be paid attention to.
① Make the direction of the weld bead parallel to the crankshaft axis.
② First weld a bead at the lower part of the crankshaft, and then rotate the crankshaft 180 ° to weld the next bead, which can balance the welding stress and significantly eliminate the welding thermal deformation. It should be noted that sequential surfacing on the first weld bead will cause the crankshaft to warp. The surfacing process is suitable for repairing and welding the roller crankshaft.
③ A 30%~50% overlap of deposited metal must be maintained between two weld beads to ensure the smoothness of the weld bead surface during machining after welding repair.
④ When manual arc welding and flux-cored wire gas shielded welding are used, the residual flux between weld beads must be cleaned by brush or cutting.
In addition to the above repair methods for crankshaft, one surfacing weld bead can be added at every 90 ° position of crankshaft to further reduce welding deformation. In the repair of bronze or copper parts, it is more advantageous to add brazing metal than to use overlaying welding to eliminate stress and deformation. See Fig. 5 for repairing worn crankshaft by welding.
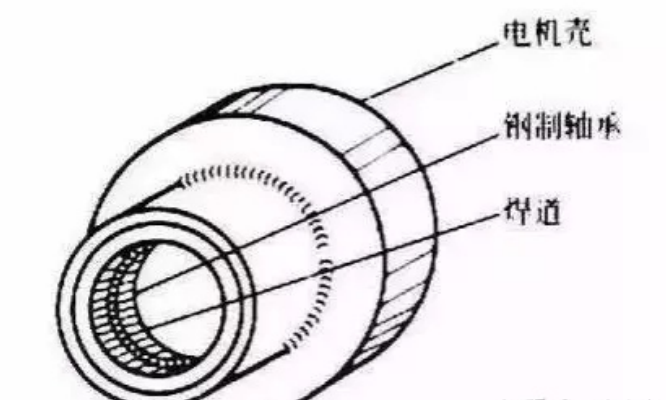
3. If there is a steel bearing stuck in the equipment and you do not want to scrap the equipment, how should you remove the bearing by welding?
First, weld a weld bead on the inner surface of the bearing, reduce the bearing diameter by the weld bead stretching force, and add heat during the welding process to make the bearing move. If the inner surface of the pipe with a diameter of 10 cm is covered with weld beads, the diameter of the steel pipe will shrink by 1.2 mm. The schematic diagram of removing stuck bearings by welding is shown in Figure 6.
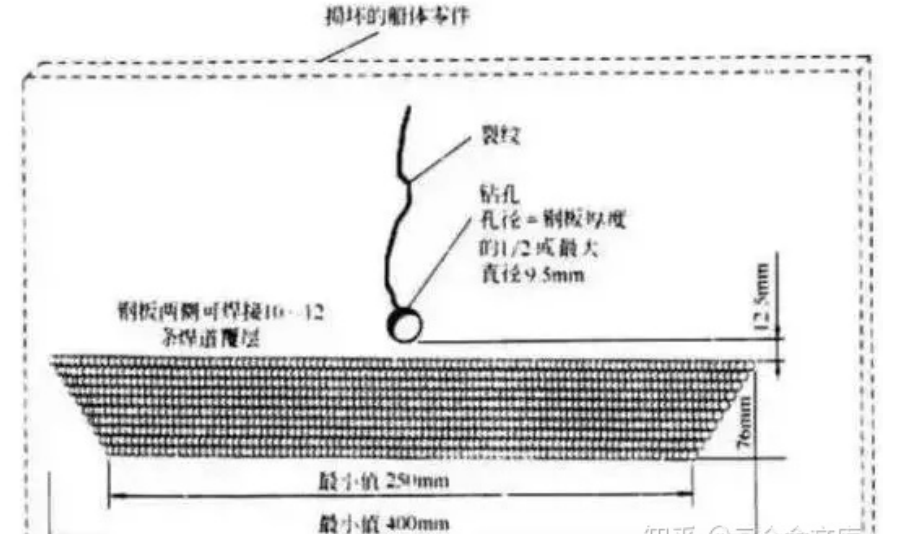
4. Cracks often occur in oil tank or ship plate structure. How to prevent them?
The solution is to drill a small hole at the end of the crack to disperse the stress at the end of the crack in a large range, and then weld a series of multi-pass welds with different lengths to increase the strength of the steel plate at the front of the crack.
Related news
Feb 09,2023
Jan 12,2023
Immediate consultation
Follow us
Contact us
Add: jinsuoyuan, wuliyao, Yanshan County, Cangzhou City, Hebei Province
Mobile phone:+86-13731702211 / +86-18630702211
Tel:+86-317-6393118
Email:a17778873989@163.com
Follow website

HeBei Cangrui Pipe Manufacturing Co., Ltd Powered by www.300.cn | SEO | Business license